Thursday, December 8, 2022

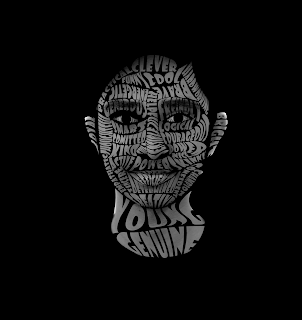
Typography Portrait inspired by Robert Reed


Follow instructions below:

You can use a self-portrait or take a photo of a friend or family member. PLEASE DO NOT USE A RANDOM STRANGER OR CELEBRITY FROM THE INTERNET. 

Make sure it’s a clear, well lit, high res image and your subject’s face isn’t covered by anything

The photo should be the face only

Plain white or gray background (You can shoot this easily in class using our white board if needed)

Write down around 30 or more words you want to use, they can be random, a poem, music lyrics, descriptive words about the subject, or quotes the subject has said. (Make sure they are school-appropriate.

Follow the tutorial to complete your portrait in Photoshop OR Photopea.com

Upload JPEG AND Photoshop file to Google Classroom Assignment. I want to see your layered file for proof of "work". 

DUE date on Google Classroom. 


Student Examples:


Not correct:


Wednesday, December 7, 2022

Photoshop Tutorial: Image in Text


Click HERE to follow a step by step tutorial on placing an image in text (You will need to use your own images or ones from the internet) POST to your blog when finished for classwork credit! Title: Image in TExt


Photoshop image in text effect. Image © 2008 Photoshop Essentials.com.

POST TO CLASSROOM WHEN COMPLETED

Thursday, December 1, 2022

Typing on a path tutorial

  If you would like to use the images they use in the tutorial, you can find them posted in GoogleClassroom and download for your needs. Any photo however, may be used. Please POST your completed image for both assignments in classroom when complete for credit today.


First, Type on a path... (click for the tutorial)


Monday, November 21, 2022

Assignment: Surreal Photo Montage


Due: 


© Cassy Siena


HOW to COMPLETE PROJECT:

1. You will need to decide on a theme for your photomontage project. I would like you to write a paragraph based on a theme idea that you have. Some examples of themes could be a memory, dream, social issue, self portrait, and or traveling.

© Shagufta Zarren


2.In your artist statement describe the types of images you used and how manipulated them to support your theme. Use a minimum of 3 original images (internet photo use is optional).


Title: "Mirror to the other Side"

© your name here...


And of course, as always, an artist statement. Use this area to explain describe, analyze and interpret your image in comparison with what you had planned, problems you ran into, etc. . example below:


Title: Surrealistic Theme 
For my surreal photomontage I wanted a self portrait. I used a mirror, using one image of the back of my head and another of my face in a mirror. In Photoshop, I partially cracked the mirror, each little section of the cracked mirror has another image of something nice and warm and outside partially see through so that my image is still visible through it. The other side of the mirror has no cracks or anything. This represents me in that the half that is intact will be reality, this is me now and what i look like. The cracked half is broken and shows where I want to be and I what I want but cant necessarily get or have so a 'broken' thought I guess.


Tuesday, November 1, 2022

Assignment: Multiply Yourself!

Multiply Yourself!

Creating this assignment is a lot easier than it looks! First though, you'll need an idea. In class, we will be learning HOW to layer your photos and create one image, but outside of class you will need to take the time to create the photographs.


Taking the Pictures
To make clones of yourself, put your camera on a tripod and take multiple pictures of yourself in different spots within the same scene. If your camera has a timer (shown next), start the timer, and then move in front of the camera so it takes a picture of you. Shoot a minimum of you 3x.


Choose a different pose for each picture. you can take pictures and then move in front of the camera before the shutter clicks. try to make your “characters” look like they’re interacting with each other by their facial expressions. Click the below images to download them so you can try it yourself!


Opening the Pictures as Layers
Open the files in Photoshop as layers, with one on top of the other. You can open multiple pictures as layers by selecting File | Scripts | Load Files Into Stack. You’ll see your photos as multiple layers within a single picture, as shown next. You can use more than two pictures.


DUE DATE:
You'll need to have your photos Wednesday, in case you have to re-shoot. TAKE MORE THAN YOU NEED in case a few images do not fit.
I would like EVERYONE to post their final image to their blog followed by your original images by FRIDAY.


HINT! The more creative your narrative, the more successful the project! 


If working at home, follow the tutorials given below to get the best results!

  • https://digital-photography-school.com/clone-yourself-step-by-step-tutorial/
  • https://northrup.photo/using-photoshop-creatively-to-make-clones-of-yourself/ 

Thursday, October 27, 2022

Photowalk Thursday: Fall Theme


Try and capture some Fall colors or themes in your images on out walk today. Use Photoshop to saturate the colors to get the above like feel if desired. Bonus points for having students in your images that we may use for the yearbook!


Wednesday, October 26, 2022

Assignment: Magazine Cover

Look at magazine covers online and post 3-5 covers you like and explain why these covers attracted your eye. Then create a magazine cover (9×12 @ 300 res)  Make it look as authentic as possible.


Your final POST to your site will have:
3-5  "inspiration images"
minimum 1 paragraph explanation why you like these covers
AND
Your original cover, which must have:
-An original cover photo
-A cover story
-A MASTHEAD (real or made up)
-A DATE or SEASON
-Overlapping of text and or images somewhere
-Well thought out font use, using minimum 2 colors
-Minimum three inside stories
-(Optional) Barcode

SEE STUDENT EXAMPLES BELOW
See DUE DATE on Google Classroom
HAND INTO CLASSROOM and Post on your blog for crit


Friday, October 21, 2022

Photo walk: Googly Eyes

Draw and cut some Googly Eyes from white paper. Cut out all around the black edge and the tape needs to be hidden behind the eyes so you cannot see the tape. We'll take a walk around the neighborhood (do at home if you're absent). Take at least 15 images that give personality to different, non-living things. Can you find life-like qualities on signs, pipes, chairs, walls, etc.?

You will bring all your images into your in house camera app, and narrow it down to your best 6 photos and edit them. With your 6 EDITED images, you will create a COLLAGE in BeFunky.com or pixlr.com because PicCollage will add an unwanted watermark to your images.
Upload it to a google classroom AND your site (title: Googly Eyes)
This is HW- and should be complete by Monday.


Monday, October 17, 2022

SELF PORTRAIT ILLUSTRATION


Take a self-portrait using the camera, tripod and self timer.

Make a new document 8×12  300 resolution.

Put your self-portrait within the new document.

Put a blank layer on top of your photograph, and lock the photo layer.

Use the pencil to trace yourself and then use brushes and colors to color in your illustration. Consider using skin and clothing tones to trace, so you are not completely outlined in black, if that is not the look you are going for.

Consider overlaying a duplicate layer with Posterise filter, to highlight the different areas of value and use shades of that color to make portrait less flat and give it more dimension.

Add a background to your illustration layer and post to your site as a .jpeg, with a list of 10 words to describe yourself. Copy and submit to Google Classroom on a doc as well. 


Friday, October 14, 2022

Color Changing: Photoshop Tutorials (2)

I've posted two online tutorials for you to learn some new tools in Photoshop.


Please POST your completed image for both assignments in classroom when complete for credit today.


Monday, October 10, 2022

Assignment: Partner Project

You will end up with two separate photographs that are your own- you will not share credit of finished product with a partner. 


"Spit Ball"                         © Arnold Guiteirez  2011


Working with one-two partners, you will use 1 class block to photograph one another. You will each be responsible for submitting your own photo for a blog POST, these should be two very separate ideas, you are only working as partners to get your photo taken. If you would like to shoot outside school, you of course can do so on your own time.


"Bully"                              ©Luiz 2011

1st Post:  Picture with a Partner
1. Plan image. Photograph according to plan.
2. EDIT image in Photoshop. Flatten, save as high quality JPEG
3. SAVE AS Last_First_PartnerPortrait and post in Google CLASSROOM
4. Attach JPEG to Google Classroom 
5. POST on your site, title post as PARTNER PORTRAITURE
6. Include in this post, a few sentences about your process, an artist statement. 


Wednesday, October 5, 2022

Monday, October 3, 2022

Where I'd Rather Be


©Owusu, 2021
©Ramirez, 2021

©Nandiwdekar, 2021


For this post, you will be manipulating multiple images to create a scene or place or situation where you’d rather be. You must use scanned or internet images (if they are good enough resolution) but the photo or yourself MUST BE RECENT AND TAKEN THIS SEMESTER BY YOU.

"I'd Rather Be with Aston"        ©Astrom, 2011


You may work with someone at home to get the photographs taken.Remember! Using a solid background will make it easier to extract figures from the photo to insert into another.
1. Plan image. Photograph according to plan, or use an image you have if it’s appropriate.
2. EDIT image in Photoshop. Flatten, save as high quality JPEG
3. SAVE AS Last_First_RatherBe and post in Google CLASSROOM
4. POST to your site as well, title post as I’d Rather Be
5. Include in this post, a few sentences about your process, otherwise known as an artist statement.


©Patel, 2021